


A strong network of SaaS integrations allows your customers to unlock many more capabilities within your product. ZoomInfo wouldn’t be able to sync contact info directly into their customers’ CRMs without a Salesforce integration. Webinar and video platforms like Vidyard can’t bring in account information or sync form submissions without HubSpot integrations.
SaaS integrations allow you to enable features that infinitely grow value for your customers, helping their businesses run more efficiently and use your product more effectively.
You’ve probably come to the conclusion that you need a more scalable way to share data with your customers. When sending data using these integrations, you have two options: build this functionality yourself or find a tool to do it for you.
- Building a SaaS integration yourself offers more control but is time-consuming and expensive, not to mention the costs of ongoing maintenance.
- Finding a solution that offers pre-built connectors to efficiently share data is much easier to onboard and maintain, but requires you to contract with a provider.
Why NOT to Build a Pipeline from Scratch
Whenever you build a tool from scratch, it requires an infinite amount of resources. You need to gather a team of engineers, product owners, product managers, and designers. These are people who either need to be hired for this specific project or who need to be pulled away from other important work within your company. This means either more money spent on hiring the right people, or other company initiatives falling to the back burner due to prioritization of work.
Whenever you build something from scratch, you must anticipate all the challenges ahead. Do the engineers you have available have the skills needed to build a data pipeline? How long will it take for them to build it? How long will it take them to research the APIs needed and comb through all of the documentation? Does this timeframe fit with your needs and customer demands? Will the engineers have time to manage and troubleshoot the tool once it’s built?
This last question is a huge consideration many teams don’t consider when deciding to build a tool from scratch. You aren’t done with it once it’s built. SaaS integrations require constant iteration, testing, and updating. Someone will need to manage it and build out new features as APIs are updated or new endpoints are added.
Building a reliable SaaS pipeline in-house is rarely the best use of engineering hours, especially when customers can and will request hundreds of integrations.
When you use a tool built by someone else, they have an extensive team of experts who do all of this for you behind the scenes. You are protected from all of the pain points they experience on a daily basis.
However, because of the complexity of APIs and data integration options, you need to find the right tool that meets all of your needs. This is where Census Embedded can help.
What is Census Embedded?
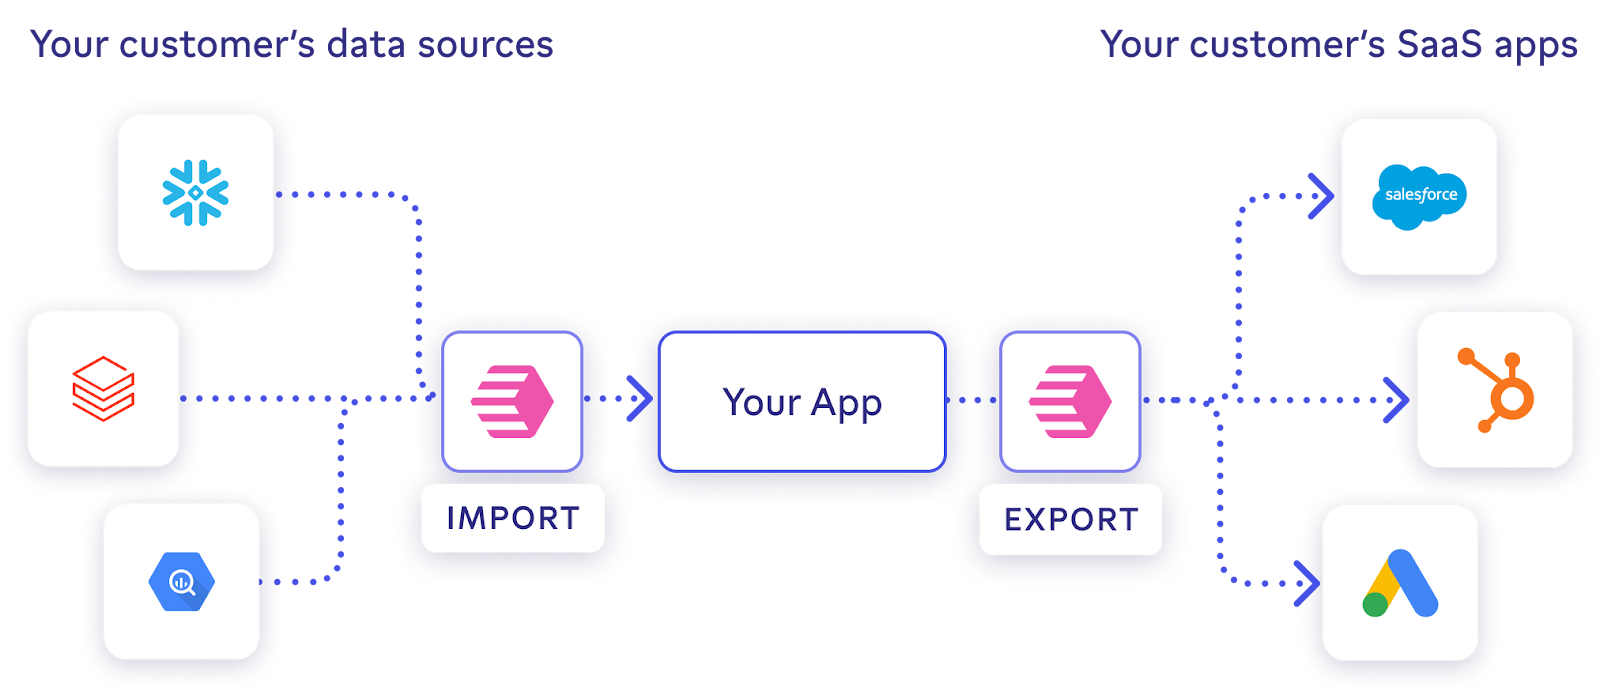
Census Embedded allows you to import your customers’ data or export your data to your customers’ systems, all from within your own application. It eliminates the need to deal with APIs from companies like Salesforce, HubSpot, and Google Ads, which lifts a huge burden off of your shoulders. Census Embedded works with 200+ different business applications, ensuring you have exactly the data you need.
If you’re familiar with Census Reverse ETL, you’re now able to offer reverse ETL capabilities within your customer-facing application easily and securely.
It even gives you the ability to monitor customer integrations to ensure everything is working smoothly. You have the same control over your customers’ experience with the data pipeline as you would with a home-built tool, but without the hassle of needing to build and maintain it yourself.
The advantages of Census Embedded
Census Embedded makes it so you don’t need to deal with extensive API documentation and schema changes which are likely to break your pipelines. If you’ve ever had to use a product built off an ever-changing API with minimal documentation, then you understand the struggle. Why deal with this if someone else can handle it for you?
Additionally, Census Embedded handles the complexities of security and compliance such as managing credentials, access controls, and protecting PII according to GDPR, HIPAA, and SOC2. Census’s Reverse ETL engine reliably and securely syncs large amounts of data, so your customers can be confident in data quality and freshness. It is fast, performant, and efficient at scale, and offers robust observability and debugging tools to ensure data integrity.
To learn more about how Census stacks up against other embedded integration providers, check out this comparison to Embedded iPaaS.
How Census Embedded accelerates product roadmaps
AI modeling platform Labelbox provides 24/7 data warehouse ingestion and helps its customers save tens of thousands of dollars in data pipeline costs.
Billing platform Metronome accelerated development of its new Salesforce integration by 4 months and saved 2 full-time employees.
eCommerce CDP Untitled adds new integrations to their product within a day, and saw 50% customer adoption within 2 weeks of launch.
How to build a pipeline with Census Embedded
The good news is that if you already know how to build a data pipeline with Census, then you already know how to build one with Census Embedded! The product works the same way but is designed with your branding and built directly into your platform.
Developers can read the Census Embedded documentation here.
To understand how Census Embedded works, let’s pretend we are sending data from your company’s managed data warehouse in Snowflake to one of your customers’ accounts in HubSpot to give their sales team more context on their leads.
1. Set up data warehouse source
The first thing you need to do is set up your source for your data warehouse, in this case Snowflake. Census supports all different types of sources from Redshift to BigQuery to Kafka to SQL Server. Connecting to one of these requires choosing a sync mode and inputting your data warehouse credentials. This will allow Census to read the data you want to send.
2. Use Census Connect Links to collect destination credentials from your users
Because security is a top priority at Census, and everyone should have full control over their data credentials, you then set up your customers’ data destination by sending them a Census Connect Link. This allows them to authenticate their services without sharing any passwords or information over email or Slack. Once the customer inputs their credentials, you will see the source or destination available within the Census app.
In this example, you would send a Connect Link to your customer to authenticate their HubSpot account. Once they authenticate the account, you can begin sending data from your Snowflake warehouse to their HubSpot.
3. Select a sync behavior
This process is the same as the core product you might be familiar with. Once you have the source and destination needed, you set up a sync to send data from one to the other. The most important thing here is that you choose the correct sync behavior.
Sync behaviors determine how changes are made to data in the destination based on changes in the upstream data source.
Update or Create upserts records, creating ones that do not exist in the destination and updating the values of ones that do.
Mirror keeps the destination in sync with what is present in the source table. If a row is removed from the source, the row is also removed from the destination.
Other available sync behaviors include create only, update only, replace, add/send, and delete.
The most important thing with sync behaviors is that it matches the customer’s expectations of how their data should look in their warehouse. If a customer wants companies within their Hubspot account to be created and deleted based on what is currently present in the Snowflake data, you may want to select the mirror sync behavior.
4. Select a sync key
When choosing a sync behavior, you also need to choose a sync key. This is the primary key of the table you are syncing. This will indicate to Census how records should be identified and updated.
With HubSpot, this is almost always the hubspot_record_id, as this represents a unique row within HubSpot.
5. Mapping your fields to be synced
Next, you’ll need to map fields from your source to your destination. If the names in the source and destination are the same, Census will map these for you. If the names differ, you will need to manually input these.
6. Test the sync
We always recommend testing your sync before scheduling it and running it in its entirety. Testing the sync allows you to send one record from your source to your destination, just as it would on the entirety of the data. Testing on one record will allow you to check whether the data looks as expected in the customer’s destination before sending the rest of the data.
When testing, keep track of the unique identifier of the row you are syncing so that you can go to the destination and ensure it updates with the data you expected.
7. Schedule a sync trigger
Lastly, configure a schedule or trigger to start your data pipeline. You can schedule your syncs to run on specific days and times using a basic chron configuration. If using a tool like Fivetran or dbt Cloud, you can also schedule syncs to run after one of those jobs is completed.
Conclusion
Census Embedded makes building a data pipeline to share data with your customers seamless. It is a familiar process that data engineers and customers alike know and love. You can quickly add critical SaaS integrations based on customer requests, without unpredictable overheads like time, cost, and engineering resources.
With Census Embedded, syncing data is as simple as securely setting up your data sources and destinations and then mapping them to one another. Customers can have the data they need rapidly, knowing it is safe and secure in the process.
Interested in getting started? Request a demo or check out our developer documentation.