In this article, you'll learn four ways to integrate Snowflake data to Salesforce, including how to get the job done with:
First things first: Congratulations! If you’re looking to move your data from Snowflake to Salesforce, then you’ve started to realize all the things you can do when you treat your data warehouse as the hub of your data architecture. This might seem like an obvious thing, but the hub-and-spoke philosophy sets you up to use your warehouse as a central powerhouse for biz ops, and syncing it with frontline tools like Salesforce is a huge milestone. Integrating data from Snowflake to Salesforce has several use cases, including:
- Providing sales teams rich first-party data to help them close new business.
- Helping marketing teams create high-quality, customized email drip campaigns.
- Supplying product teams valuable data to understand and improve the customer experience.
Whatever your use case, being able to integrate Snowflake to Salesforce is essential. In this article, we’ll cover four different methods and describe the pros and cons of each.
Method #1: Data Loader
Data Loader is a web-based 3rd party application that allows you to import/export data from Salesforce. It's more flexible than Data Import Wizard (discussed in method #3) because it allows you to upload up to 5 million records per sync. You can schedule the loader so Salesforce can retrieve recent data regularly. Plus, you can use Data Loader for objects that aren’t supported by Data Import Wizard. To implement Data Loader, complete the following:
- Install Data Loader on your macOS or Windows. When you execute the installer file, you can select and download Data Loader and its installer.command file.
- Configure Data Loader by deciding batch size, null value handling, host address, login credentials, compression type, timeout, query request size, encoding, and more. You can view detailed documentation here.
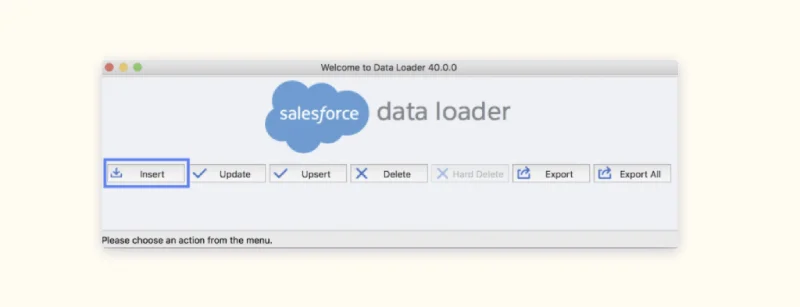

Once you have Data Loader installed and configured, it’s time to get down to business.
To execute the data loader, you can use either batch mode or Data Loader Command Line Interface (CLI).
- Batch mode: You can run a series of data loading tasks using the Windows command-line tool (Note: This only works on Windows!).
- Data Loader CLI: You can perform more flexible tasks using the CLI tool, including inserting, updating, or deleting records. You can also programmatically map fields between the source and target data and use CSV data sources to import into Salesforce.
Like any data solution, there are pros and cons depending on your use case and needs. Here’s a quick breakdown:
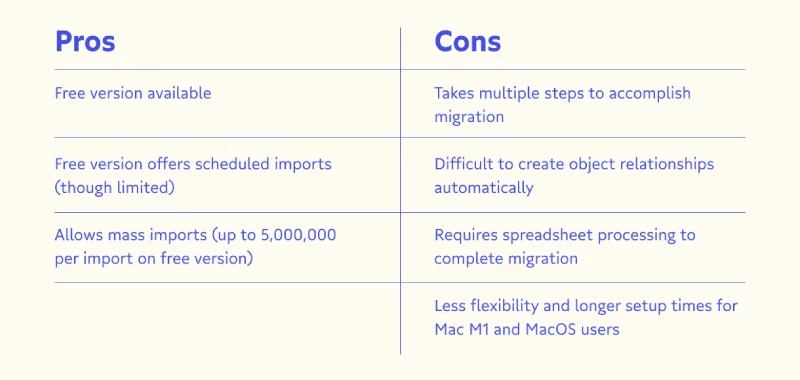
Method #1 helps you move data from Snowflake to Salesforce using your terminal or command line. Let’s take a look at an entirely different approach: reverse ETL with Census.
Method #2: Reverse ETL with Census
Reverse ETL syncs data from a system of record (e.g. Snowflake) and to a system of action (e.g. Salesforce). Reverse ETL allows you to send data seamlessly between Snowflake and Salesforce without custom code or having to worry about the integration breaking when either source or destination updates.
Our reverse ETL tool has built-in sync and native integrations for both Snowflake and Salesforce. These integrations are flexible and allow you to integrate Snowflake data into several Salesforce destinations and objects. Census also has SQL modeling capabilities, allowing you to easily create database instances. Finally, we’ve worked hard to provide an intuitive UI to make implementation and troubleshooting quick and easy. Here’s the breakdown for integrating Snowflake data into Salesforce using Census reverse ETL:
- Connect Snowflake as a data source using your Snowflake account credentials
- Connect Salesforce as a service connection using your Salesforce account credentials
- Write a SQL model to create an instance of your Snowflake database. Here’s some example code to get you started:
with score as (
	select user_id,
		sum(case
			when name = 'webinar attended' then 3
			when name = 'appointment created' then 4
			when name = 'appointment shared' then 2
			when name = 'content downloaded' then 2
			when name = 'email opened' then 1
			else 0
			end)
         as lead_score
	from "demo".events
	group by user_id),

webinar_attended as (
	select user_id, count(*) as count
	from "demo".events
	where name = 'webinar attended'
	group by user_id),

content_downloaded as (
	select user_id, count(*) as count
	from "demo".events
	where name = 'content downloaded'
	group by user_id),

appointment_created as (
	select user_id, count(*) as count
	from "demo".events
	where name = 'appointment created'
	group by user_id)

select email, lead_score, webinar_attended.count as webinar_attended, content_downloaded.count as content_downloaded, appointment_created.count as appointment_created, first_name, last_name, company_domain, role, website, location, u.user_id, 'subscribed' as status
from "demo".users u
	join score on score.user_id = u.user_id
	join webinar_attended on webinar_attended.user_id = u.user_id
	join content_downloaded on content_downloaded.user_id = u.user_id
	join appointment_created on appointment_created.user_id = u.user_id
where lead_score > 10
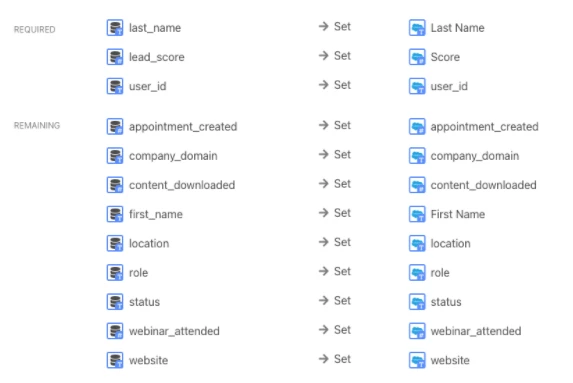
Next, you’ll need to map your required fields and remaining fields. Remaining fields aren’t required to sync, but can further enrich your data in Salesforce.
As I said above, everything has its pros and cons. Here’s the breakdown for reverse ETL/Census.
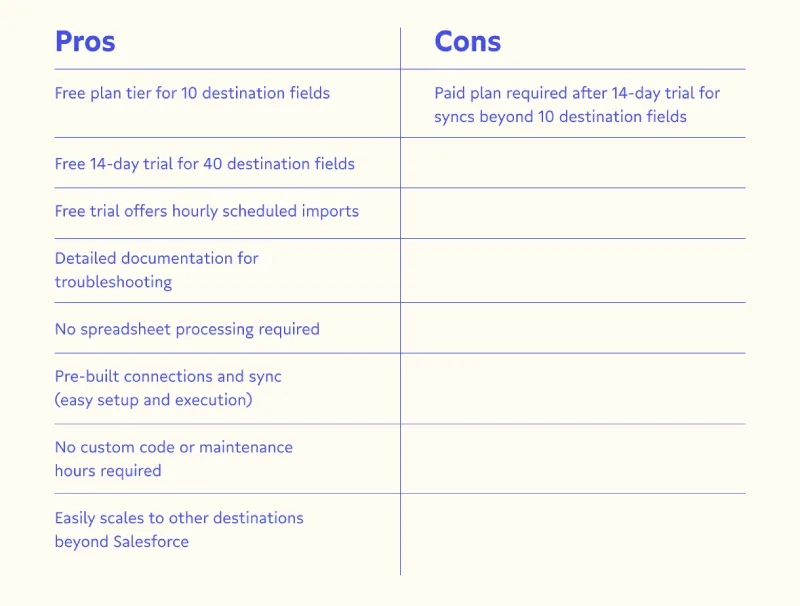
Now you’ve seen reverse ETL with Census, let’s check out another method that is comparable to Method #1: The Data Import Wizard.
Method #3: Data Import Wizard
Data Import Wizard is a Salesforce native feature that allows users to easily upload data from various sources, including Snowflake. You can upload customer-related data such as accounts, contacts, leads, solutions, campaign members, and more. It supports the import of up to 50,000 records at a time.
Before we begin, you need to export your data in CSV from Snowflake. The simplest way to export is using a SQL client connected to your Snowflake cluster to run a SELECT query. Then, export the result in a CSV file. Here’s an example:
snowsql -c my_example_connection
  -d sales_db
  -s public
  -q 'select * from mytable limit 10'
  -o output_format=csv
  -o header=false
  -o timing=false > output_file.csv
Alternatively, if you’re familiar with Snowflake queries, you can consider using a COPY command to export data into an AWS S3 bucket. You can download the CSV file from there, too.
Lastly, Snowflake has a CLI tool called SnowSQL. Using a SnowSQL CLI command, you can directly download a query result into your Linux server or local hard drive. Once you’ve prepared your CSV data, you’ll need to do two things:
- Go to Setup in Salesforce and type Data Import Wizard in the Quick Find bar (as seen in the image below). Then, select Data Import Wizard.

- Check the prompt information and click Launch Wizard.
From here, you can either select standard objects (to import accounts, contacts, leads, solutions, person accounts, or articles) or custom objects (to import custom data). Then, decide the type of import: add new records, update existing records, or add and update.
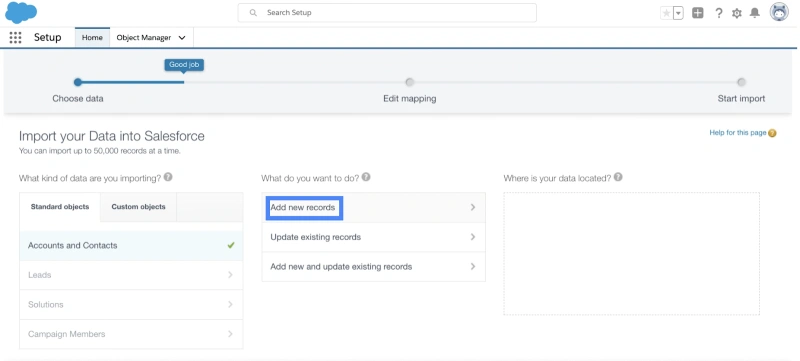
The rest of the fields depend on your use case.
You’ll then be prompted to upload your CSV file. Select comma or tab for the value separator, and then hit “next”.
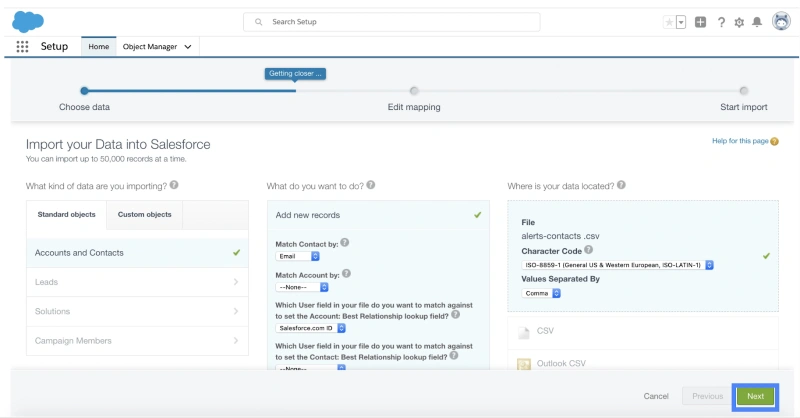
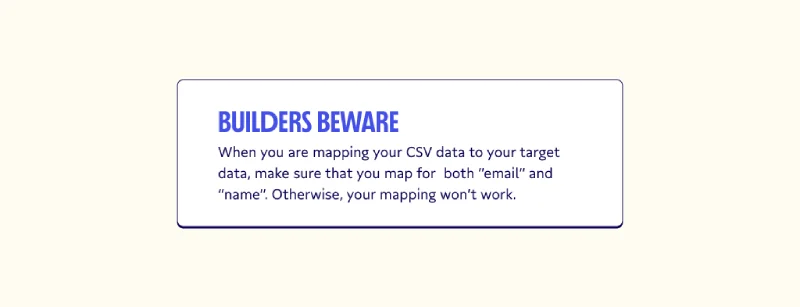
The Data Import Wizard isn’t an automatic way to sync between the two platforms. If you want to have the freshest data possible in Salesforce and want to use a wizard, we recommend using method #1. However, if you only want to load data once, or if there is a security policy that blocks connection from Salesforce to Snowflake, we’ll take a look at one more option at your disposal.
Before we move on, however, here’s a breakdown of the pros and cons of using the Data Import Wizard.
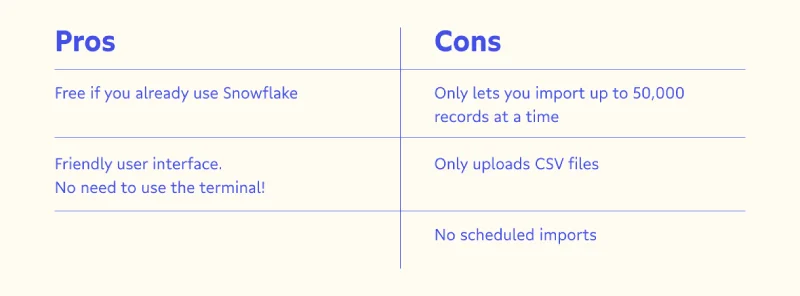
Lastly, let’s take a look at method #4: The Snowflake Connector.
Method #4: Snowflake Connector
For our final method, we'll break down how (and when) to use the Snowflake Connector, which lets you sync between Snowflake Salesforce’s using Tableau CRM Analytics Studio. To do this, we’ll need to create Snowflake objects in our Snowflake account and prepare the following:
- Database and schema for the Salesforce data
- XSMALL or SMALL warehouses to load the data
- A proper role with the right permissions to use the data in the prepared database and schema
- A user that has the role defined above
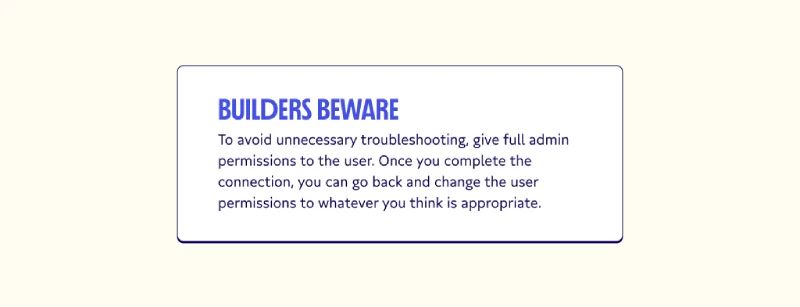
Now, you can enable data to sync out to Salesforce with the following steps:
- Find Setup in Salesforce
- Type “analytics” into the quick find search bar
- Go to Settings
- Select “enable data sync and connections”, “enable Snowflake output connection”, and “enable direct data for external data sources”
Finally, let’s create an outbound connection from Analytics Studio in Salesforce to Snowflake.
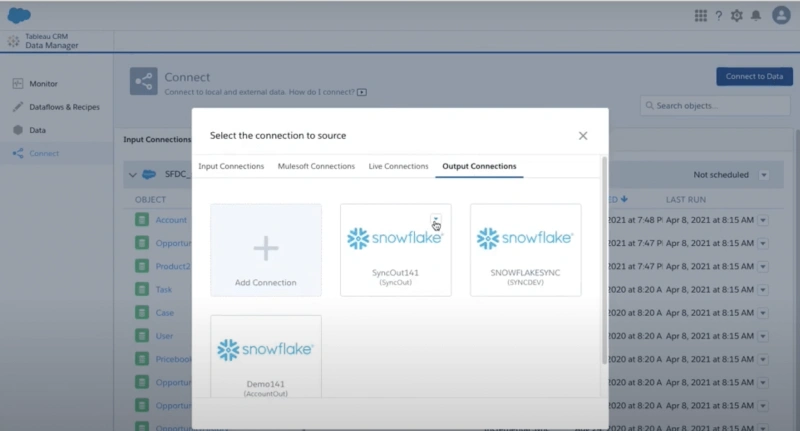
First, go to Analytics Studio in Salesforce and Data Manager and click the Connect tab. From there, click the “connect to data” button in the top right. Then, click “output connection” followed by “add connection”.
Next, choose the Snowflake Output Connector and fill out the required fields. Select “save & test” to make sure the connection works.
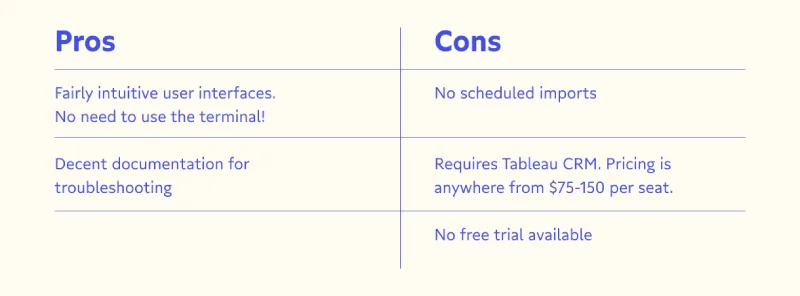
And voila! You’ve successfully synced your data between Snowflake and Salesforce using the Snowflake Connector. Here’s a quick breakdown of when this method works best, and when you might want to consider another method on this list.
Where to go from here: Choosing the best option to export data from Snowflake to Salesforce
In this article, you’ve learned about four different ways to move data from A (Snowflake) to B (Salesforce).
As we touched on in each section, each respective method has its strengths and its weaknesses. As you consider your data needs for this use case (and beyond), you should choose the one that best fits your workflows.
If you’re doing this integration as a one-off sync, methods one, three, and four will get the job done without too much sweat. However, if you’re using this as the jumping-off point to integrate data from the warehouse to a bunch of frontline tools, we’d recommend reverse ETL (method three).
Reverse ETL removes the headaches of syncing your Snowflake data warehouse to your frontline tools like Salesforce, giving everyone the freshest data possible. Plus, it unlocks the true potential of your data teams and your frontline teams to spend less time building and working on integrations and more time doing great things with great data. Oh, and don’t forget: You can try it for free!

